Sunday, June 27, 2010

Farewell to Nursery Necessities

Nursery Necessities...I can't really remember a time before I had this set. I've used it soooo many times and for sooo many babies!
Before we say a final goodbye I thought I'd post a couple items that I had laying around that I never had a chance to post before.

This first one is a baby shower invite I made but never had a chance to use because the mom-to-be had a girl instead of a boy. Ooops. I always really liked the invite and was sort of hoping to get a second chance to use it. Oh well.


And this little gem is what I made as thank you notes for all the people who gave me a gift when I had my Maggie. I made about 60 of them and I had a brand new baby so it's a super quick design. I'd say this qualifies as a 5-minute card don't you think?


Click the link to see some more projects I made with this sweet baby set.

Farewell Nursery Necessities, you will be missed.

Friday, June 25, 2010

Sneak Peek - Because I Care

Today's card is made using one of the hostess sets in the new 2010-2011 Catalog. I also cheated just a little by using lovely lilac, which has been my favorite of the retiring purples. I just had to use it one more time.
I also spritzed the card with Log Cabin Smooch, which adds a nice touch.

To color the image, I squeezed (squoze?) my ink pads and used a blender pen to pick up ink from inside the lid. I tried to create varied colors to look like an actual hydrangea flower. I cut out the flower part to add a little interest, but it's not really necessary.
And lucky for us, the scallop border punch used here for that sweet green border will also be in the new catalog. Yay!
I made a bunch of these for my Mom because she always seems to need a nice sympathy card. I guess that's part of getting old, huh Mom?
 Just kidding, you're not old. Yet. Heh heh.
I used:
* Because I Care, and Teeny Tiny Wishes stamp sets
* Old Olive, Very Vanilla, Lovely Lilac card stock
* Old Olive, Certainly Celery, Lovely Lilac, Early Espresso ink
* Log Cabin Smooch Spritz
* Scallop Edge border punch, Lots of Tags sizzlits
* Linen thread, Old Olive satin ribbon
* Blender Pen

Thursday, June 24, 2010

Card Stock Sampler and Open House!

Well, we're really getting close! July 1st marks a new year for Stampin' Up! and with that, a new catalog, new stamp sets, new colors, a new stamp club...etc. It's all very exciting!!!
To mark the new year, I'll be having an open house on Saturday July 10th from 10:00 to 2:00. There will be a TON of new things to see and try, retired sets to buy and sell (get there early if there is a specific set you want!), prizes to win, free gifts to get, catalogs to see...I just can't describe it all. You HAVE to come!!!
One of the things that will be for sale is this Card Stock Sampler I made. I was feeling a little overwhelmed by all the new colors combos and I kept wanting to compare the new colors to old colors to figure out how they could fit in, so I ran each and every color through my big shot and had my mom write the names of them on them (because her handwriting is so nice) and this is how it turned out. I love it!
I'm not sure how I lived without one of these for so long!

The cost is $10.00 and I'll have them available, as well as a ton of other stuff at my open house. Or you can just let me know you'd like one and I'll get it to you.

I have lots more info about my open house, but if you don't receive an email with more details about it, please let me know.

I'm so excited to see everyone!

Wednesday, June 23, 2010

Farewell to Season of Simple Grace

Since I'm saying goodbye to a number of stamp sets in a few days, I thought I'd feature them on my blog one last time. Up first: Season of Simple Grace.

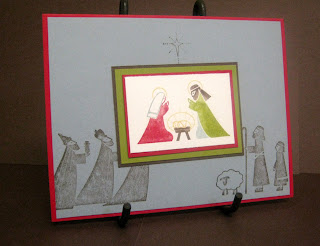
This is a sliding pocket card I made a Christmas or two ago. It uses the baby wipe swipe technique, but this is not one of my better examples of that. Do use this technique justice, you must have a silhouette stamp to go over it like this one, or at least some bold words.
Here's a view of the inside. I'll miss this set simply because it has so many great pieces to it. It tells almost the entire Nativity story beautifully.


For this card I used my markers on the stamp to color the main image.

Same idea here except with out the markers and I tried to make it a bit shabbier.


To see some more of my projects made with this lovely set, click here!


Wow Flowers Box

I made this box full of Birthday Cards as a big thank you to my friend Cali for fussing over my birthday. Thank You!!!
the box is simple yet functional, it holds 12 cards and envelopes and as she uses the cards, she can always add more cards to it as she goes.


before I show you all of the birthday cards, I thought I would show the actual thank you note I made.


I used the same theme for everything in this project. The same stamp set, same colors, same embellishments...etc. That way, not only does it look like a set, it's a lot easier to make. Win win.


I made 3 of each of these cards. Here is the first:

And the second:
This card was inspired my a card by Debbie Henderson, and here is her blog.  http://debbiesdesignsblog.blogspot.com/


This third card is also the card we made at club this month. I chose it because it was so simple and quick to make. Also, if you happen to have different colors, punches, stamps...etc. You can still make this card. It's pretty forgiving. I like that in a card.
This card was inspired by Cindy Schroedl but I wasn't able to find her blog. If anyone knows of it, please let me know!


And here is the last card I made for the set. I pretty much just took elements I liked from some of the other cards and used them to make this card. I think it still counts as creativity even if it is a bit recycled.

And here's a close up of the thank you note.
This card was inspired by a similar card made by Brenda Cannon but alas, I cannot find her blog to give her proper credit either. Thanks for the lovely card idea!

Have I made you want this cute little set yet? Only a few more days to get it, it retires at the end of this month.

I used:
* Wow Flowers stamp set
* Crushed Curry, Melon Mambo, Night of Navy, Old Olive and Whisper White
* Circle punches, Scallop punch, Scallop circle punch
* Silver brads, polka dot impressions folder
* Old Olive Grosgrain ribbon, Melon Mambo polka dot ribbon, Old Olive satin ribbon

Thursday, June 17, 2010

Post-it Note Holder!

One of the projects we made at club this month is this cute little post-it and pen holder. I've been wanting to do something like this for months now and I'm so happy that I finally pulled it off. It was all about finding the little pens really. Staples. They are ONLY at Staples. Don't even bother checking in all of the other stores.
The stamp set I used, Razzle Dazzle, is NOT retiring, but the paper, Razzleberry Lemonade is. I've loved this paper and really I only had scraps left of it but I knew this was my last chance to really use it so I just had to get it out. I also used Crushed Curry, which is also saying goodbye. Sniff. It took me a while to warm up to you Crushed Curry, but you will be missed.


The other thing that will be missed?
All of the polka dot ribbon. So so sad.

In addition to the post-it note holder, I've also been dying to try my hand at these cool rolled flowers. They seem a bit fussy at first but once you get going, they're pretty easy. As long as your fingers can take it.


Here's the inside view. I should have written a little note there on the post-it. Something like "Natalie is Awesome!"

To learn how to make the cute little paper roses I used, click here to watch a great tutorial. My favorite part is that you can make them any size you want and you don't need any special tools, just scissors and glue. I punched out 1 1/4" and 1 3/8" circles of cardstock for the roses I made but you can make whatever size you like.

To learn how to make the little post-it holder, you HAVE to watch this video on Dawn Griffith's blog. She does a great job of showing exactly what to cut and how to fold. After watching her do it, the project gets really simple but trying to figure it out on your own is nearly impossible. It was for me anyway.
The measurements that are shown on Dawn's lovely site are:
Cut to 7 3/8 x 3 1/4"
Score at 3 1/8, 3 1/2 and 3 7/8"

I tweaked it because the post-its that I bought were a bit bigger. My measurements are:
Cut to 7 9/16" x 3 1/4"
Score at 3 1/8, 3 9/16 and 4"

Monday, June 14, 2010

Happy Grad Again!

I made these two grad cards for some great kids who just graduated from the local high school so I used their colors. The one with a ribbon is for a girl and the other is for a boy although I think it looks a little bit nekkid with no ribbon. Oh well. I'm sure he won't mind.
I used:
* Happy Grad stamp set
* Night of Navy, Bashful Blue and Whisper White card stock. Bashful Blue d.s.p.
* Night of Navy ink
* Large star punch, white satin ribbon

Saturday, June 12, 2010

Farewell to You + Moi

I thought since it is June and all, I might feature all the stamp sets I have that are going away forever. Here are a couple cards that I made before I had a blog and so of course, never been posted.
This first card is super quick a simple. I also think it's pretty cute...if I do say so myself.
I used:
*You and Moi stamp set (and another set for the words but I can't remember the name of it. Sorry!)
* Pretty in Pink, Real Red, Chocolate Chip and Very Vanilla
* Scallop Punch, 1 1/4" circle punch, 1 3/8" circle punch


This card is another pretty quick card that I made with this set. It also uses some Kiwi Kiss which is now gone, but I'm sure you get the point.
I used:
* You and Moi stamp set
* Pretty in Pink, Kiwi Kiss and Real Red
* Kiwi Kiss Ribbon, Scallop Square punch, Corner Rounder punch


And here's the set itself. So cute and so little. I'll miss it. A lot.

For another card I made with this set click here.

And for the infamous Condom Cards that were made with this set, click here

Thursday, June 10, 2010

C is for Cat

I made this "Cat Box" for Janet, a good friend that loves her sweet cat, Mr. Scooter. Janet is wonderful and I really can't tell you how much I enjoy getting a card from her. They are always so cute and funny and they ALWAYS have a cat. I saw this stamp set and I just knew what I had to do with it.
This box holds 12 cards and envelopes and is actually pretty sturdy.

I made 4 of each card. Because I wanted it to look like a set, I chose a few kitty-ish colors and then made everything using them. I also stuck with the same style of stamping, simple with lots of squares and rectangles.
I think this green one is my favorite of the set.


And because I wanted to finish it up nicely, I also stamped a little kitty paw on all the envelopes.

I used:
*C is for Cat stamp set
* Certainly Celery, Chocolate Chip, Pumpkin Pie and Very Vanilla card stock and ink
* Certainly Celery d.s.p
*1 1/4" circle punch and 1 3/8" circle punch
* Chocolate Chip 1/4" Grosgrain, Chocolate Chip 5/8" Satin, Certainly Celery 5/8" Grosgrain and linen thread.

Saturday, June 5, 2010

Baby Roxy!

Welcome Baby Roxy!
I'm off this weekend to go see my sister's new baby and of course, I'm taking along these cute baby announcements. Can't wait to meet her!
I know I've been doing a lot of digital stuff lately but I think this is the last of it. For a little while at least. You'll be happy to know that I have also been stamping with actual paper so there should be more posts in the next few days.

By the way, I got my NEW CATALOG today. It's...amazing! In fact, I only got a chance to look through it once before going out to dinner with the hubby, so I took the catalog with me to read in the car. Ah, marriage. So romantic. I think I'll take it to bed with me and look through it one more time before going to sleep.

Oh, and there IS a tooth fairy stamp. Seriously.

Thursday, June 3, 2010

Baby Shower Invite!

My cute niece Kjirstin is having a girl and this is the front of her baby shower invitation. Yay! I'm so excited for her!

I made this invite using My Digital Studio software and it was actually really fun. This is one of their pre-made templates that I tweaked from yellow to pink and rearranged the embellishments to fit the little verse on the top. I love that I only have to design and create one card for this and then have as many printed as I want instead of spending hours cutting and stamping 30 of them. I still love stamping the old fashioned way but when it comes to doing things in bulk, I'm a fan of digital! I can almost promise that my Christmas card this year will be done this way too. I can hardly wait to get started!

Congrats Jon and Kjirstin!

Tuesday, June 1, 2010

Last Chance Lists!

It's here, the last chance (aka "retired") list!

Follow the link below to browse retiring stamps, accessories, sale items...etc.

My first impression is that not much of my stuff is retiring. I mean, usually half my sets disappear, but then again, maybe most of my stuff came out of mini catalogs and so it just doesn't show up on the retired list. Who knows.

Happy shopping!

http://www.stampinup.com/ECWeb/CategoryPage.aspx?categoryID=736

Just in case anyone was wondering, I waited til midnight, then I placed an order so that I can get my demonstrator copy of the new catalog as soon as possible. I can't wait!