Tuesday, April 19, 2011

Spring Card Class and Open House!!!

Spring Card Class and Open House!!!
Dates:
Thursday May 19th 6:00-9:00 pm
or
Saturday May 21st at 10:00am - 1:00 pm

At My Home
3924 Parker's Place
Eagle Mountain, UT 84005

Class:
Cost is $20.00
Price includes:
*12 cards (4 each of three styles)
* 12 Envelopes
* Yummy snacks
* Prizes
* Class AND Open House prizes and goodies!

Open House:
FREE!!!
* Yummy Snacks
* Prizes for bringing a friend!
* Door Prizes
* Cards and hand stamped goodies for sale
* Card to make'n'take

Everybody should come!
The class and open house will be held on both days at the same time. For those of you interested in making cards, the class is perfect! For those of you who aren't too sure about making cards, stop by to browse the for-sale items and enjoy the company!  

If you'd like to attend the card class, please let me know by May 10th.
All you need to bring with you is a pair of trimming scissors and some scrapbook adhesive. If you don't have any adhesive, I'll have some available for purchase.

Phone: 801-341-9048
or
253-315-3701


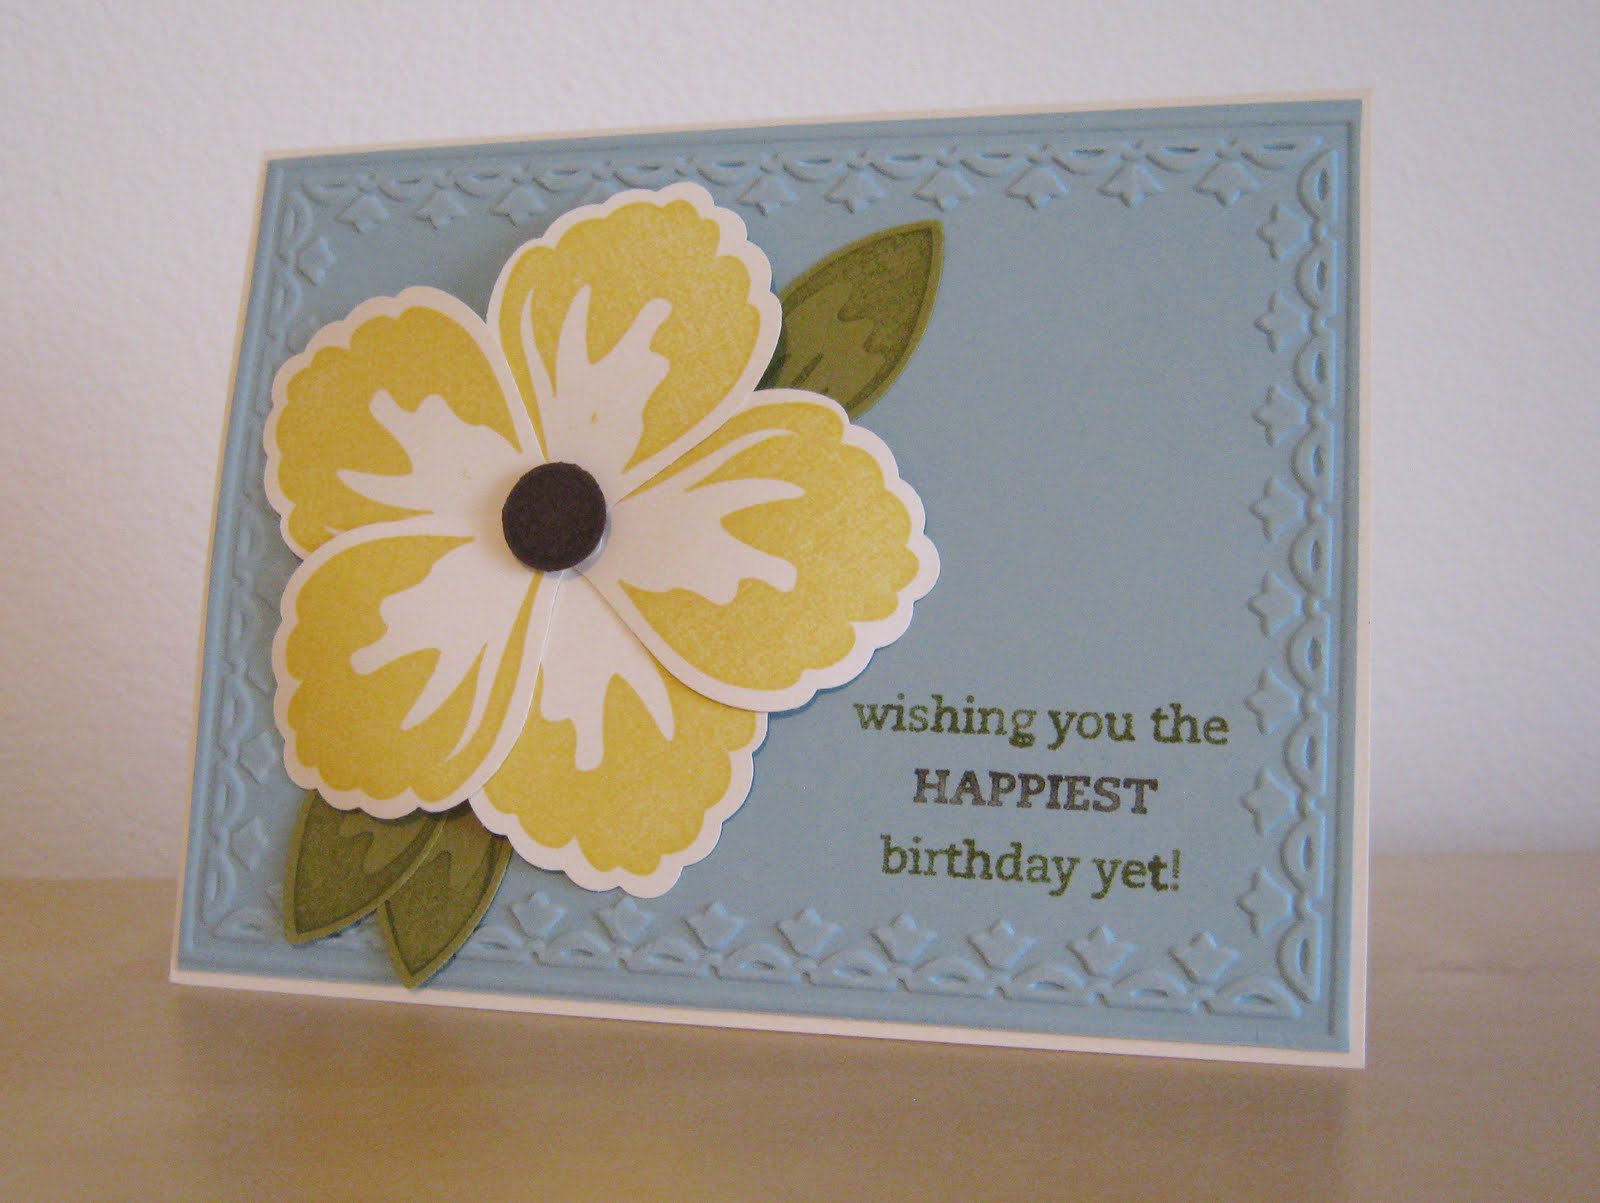
These are some up-close images of the cards we'll be making for the class:

Card #1:
You'll make 4 of these but don't worry, there is no hand cutting! I have a punch for all the parts of the flower!

Card #2:
Can you see the glitter on the cupcake? Well, its on there, and its even cuter in person! You'll make 4 cards just like this one.


Card #3:
Instead of 4 identical cards, you'll make one of each of these 4 colors for this card! AND I'll teach you a trick to tie a pretty knot with your ribbons too!

Sneak Peek - Best Dad Ever

This is a handy little set from the Summer Mini Catalog which goes on-line on May 1st! Everything in this mini is adorable and if you haven't seen it yet, I've added a link on my right hand side bar.

Did you notice I finally updated my blog? Well I did and I feel soooo much better!

Anyway, I know Father's Day seems like a long way away, but June sneaks up on me, so I'm getting started now. And this set is so fun because it comes with lots of handy phrases as well as the fun ties image. It has "Happy Father's Day" "Best Dad Ever" "Happy Birthday" and "Thinking of You" all of which will be pretty useful. And did I mention the ties are about as manly as anything I've seen? Well, I like the cowboys sets too, but I know a lot more men who wear ties to work than I do who ride horses so I'm feeling pretty practical here.
I think my husband owns ties that look like all of these. He's an attorney so, you know, he has lots of ties.
And do you see that cute string? Its also in the Summer Mini and its called Baker's Twine. It comes in white, white and red, and white and brown. So fun!

Here's another version of the same card again but with a scrap of the new Nautical Expedition designer paper. Cute huh?

I used:
* Best Dad Ever stamp set
* Soft Suede, Cherry Cobbler, Night of Navy and Whisper White
* Polka Dots impressions folder
*Baker's Twine

Monday, April 4, 2011

Clearly For You

I bought this lovely set, Clearly For You, quite a while ago and this weekend was the first chance I had to play with it at all. It has a lot of tiny and pretty images that could be used for sooooo many things! My next project will be some Jane Eyre inspired bookmarks for my book club, but I thought I'd post these two cards now since who knows when I'll get around to that!
When I'm using a new set, sometimes its nice to copy something from the catalog. It sort of eases me into the feel of the images, their sizes and what I can do woth them. If this card looks familiar, its very simalar to a card on page 29 of the Occasions Mini. But so fun to make!
The colors I used are Marina Mist, Old Olive, Cherry Cobbler and Whisper White.


And this card, while not being a copy really, is inspired by a little matchbox on that same page. Sometimes the Stampin' Up! ideas are just to good not to copy..at least a little!
The colors I used on this card are Crumb Cake, Cherry Cobbler, Old Olive and Naturals Ivory.

Monday, March 21, 2011

Bold Blossom

Tonight's post features the new Bold Blossom stamp set from the Occasions Mini catalog. Not only is is amazingly cute and easy to use, its also only $9.95 (clear) !!! This is a lot of cuteness for under $10!!!
I love when a set comes with a bold main image, (flower and stem) a nice accent (butterfly) and a greeting that you might actually use (thank you for being you) and this little bargain has it all! I couldn't resist! In fact this set is such a nice complete package that I got distracted and made all of the cards using the included "thank you" greeting instead of making them all into "happy birthday" cards like I planned. Ooops.

Here is my very favorite of the night's work. I had sooo much fun making this! From the textured background and rhinestones to little whimsical butterfly, it was truly a delight. AND it was a first try! Like I said, this set is sooo easy to use!
Circle punches are always handy to have around. On this card I used the 3/4" and 1" sizes on the flowers as well as the 1 3/4" for the greeting. Such a great investment!

These next 4 cards are a little bit simpler and easier to replicate but I think still pretty cute. The color scheme was inspired by the package of Bold Brights brads I have that I really wanted to use. I have a hard time using brads and buttons because it seems like I'm always wanting to pick out one or two colors while the rest languish away abandoned and unloved...but not this time!
To make these flowers I punched out 3 Extra Large Fancy flowers, snipped the petals apart on the top one then just crinkled them briefly in my hand. To assemble, simply peirce the centers and layer together.
The yellow one is my favorite!

I adhered the flowers with Stampin' Dimensionals because I find they are reliable as well as forgiving if you need to say, rip the flower off and change the colors around a bit.
Not that I would ever do that.
Multiple times.
I cut out a little butterfly on these two cards and stuck it on with a glue dot right on top of a coordinating stamped image, but on some of them, I just used the stamped image and that looks fine too if you REALLY hate hand trimming.

*I used:
* Bold Blossom stamp set
* Rick Razzleberry, Old Olive, Delightful Daffodil, Pumpkin Pie, Real Red, Tempting Turquoise and Whisper White
* Bold Brights Brads, Basic Rhinestones
* Old Olive Grosgrain Ribbons (both sizes)
* Square Lattice impressions folder
* 3/4", 1", 1 3/4" and Fancy Flower punches
* Paper Piercing tool

Friday, March 18, 2011

COWBOYS!!! (Take time to savor them!)

You remember how a couple years ago everything was pirates? Well, that's how I'm feeling about cowboys lately. The last two movies I've seen are True Grit and Rango (loved both!), the last couple books I've been crazy about are set in Yellowstone (more to come on that!) and I've just moved into a neighborhood that is all western themed from street names and architecture to the elementary school my son goes to. I'm sort of obsessed and here are the products of my obsession:
I got the idea for this first card from a talented card maker named Michelle Pollard.

I am totally crushing on the little cowboy! He's so cute!!! OK OK I'm actually imagining him as Hugh Jackman in Australia. DROVER!!!!

 Need a closer look at that rope?
Who knew hemp twine could look so good? Not as good as THIS, but still, pretty good.  

Because I loved the rope idea so much, I thought I'd try it again but this time without any water coloring.  I'd like to dedicate this next card to Matt Damon. I know he isn't quite his typical self here, but COME ON!!!
Am I right?

And because I liked the boots so much, I had to make yet another card. And, if you hadn't caught on by now, this to is going to be dedicated to a special cowboy out there. This movie (Cowboys and Aliens!) hasn't actually come out yet, but let me just say that when it does, I'll be the first in line!!!
This one's for you Daniel Craig!!!
Is anyone even looking at the cards anymore?
I know I'm not.

So who wants to get your shiny cowgirl boots on and "Celebrate" Cowboys with me this summer at the movies???
Anyone? Anyone?
In case you were wondering, this card is a lot shinier in person. Darn Camera.

* I used (abbreviated list for first 3 cards)
* Out West and On Your Birthday stamp sets
* Cajun Craze, Early Espresso, Naturals Ivory, Crumb Cake
* Hemp Twine, Jumbo Eyelets
* Blender Pen and Stampin' Pastels
* Antique Wallpaper and Square Lattice embossing folders

I used (for the pink card)
* Rose Red, Basic Black (with Stayz On ink), and Whisper White
*Basic Rhinestones
* Silver Smooch Accent Ink

Tuesday, March 15, 2011

Button Birthday

I feel compelled again to show you the entire journey of making a card. Most of the time one good card takes at least 3 tries, sometimes more. My stamping room is normally filled with bits and pieces of cards I've made and torn apart and don't know what to do with.  This one only took 2 tries! Yay!!!
Here's Take One:

And Take Two:
Isn't it amazing what a layer can do? The whole card pops with color now and its just that much cuter. Also, adding this much card stock costs very little and doesn't harm the card's ability to fit in an envelope either. I say when in doubt, add a layer or two!

And how cute are those buttons?

I used:
* Button Button and On Your Birthday stamp sets
* Rose Red and Crumb Cake ink
* Rose Red, Crumb Cake, Old Olive, Daffodil Delight, Pumpkin Pie, Tempting Turquoise and Whisper White card stocks
* Old Olive 5/8" ribbon
* Sweet Buttons embosslit
* Two Tags Die

Monday, March 14, 2011

Build a Blossom!

I'm really trying to get back in the swing of stamping. I mean, holy cow, it's the middle of March and I haven't even used my spring mini goodies yet. I'm so ashamed.
So, the goal today was to thoroughly play with my Build a Blossom stamp set, Blossom Petals Punch and my Framed Tulips impressions folder. Here are the results!
This is the first card. The flower was super-fun to make but the card itself is super-boring!


So I used the same flower (basically) but spiced up the card a lot. Amazing what a difference a brad can make right? As well as a layer or two! But this flower was a problem now because while its fun and pretty, if I had to make a bunch of them I would hate my life and I have a rule that if I can't make 100 of them, I don't want to make any.


Which brought be to this little beauty. How happy is that yellow flower??? And how cute is the striped ribbon??? But for some reason I wasn't quite satisfied. I don't know why because I actually really love this particular card. Oh well.


But here is my last and final card. Not as flashy as the one with the brad or as cutesy as the one with the ribbon but for some reason, still my favorite. I guess I was in a plain and simple kind of mood. Who knows.

So which one is YOUR favorite???


I used:
* Build a Blossom, Teeny Tiny Wishes and On Your Birthday stamp sets
* Pink Pirouette, Naturals Ivory, Pear Pizazz, Early Espresso, Baja Breeze, Daffodil Delight, Old Olive and Very Vanilla (assorted card stocks and inks)
* Framed Tulips impressions folder
* Blossom Petals Punch, 1/2" circle punch, Word Window punch, Modern Label Punch, Crop-o-Dile
* Linen Thread
* Antique Brads, silver brads