Showing posts with label On Your Birthday. Show all posts

Saturday, September 10, 2011

WINNER!!!


Remember this post form earlier this week?

Well, guess what...my card won!!!
And I am soooo excited about it!

Nance Lempinen-Leedy, of Canopy Crafts chose my card as the winner of The Paper Players challenge for the week.

Here's what she said about MY card:


I love Natalie’s clean and elegant birthday card! The newsprint patterned paper is always a great touch but Nat has taken it to a whole new level by with her stamped and hand-cut flowers! They add such a bold graphic element and she’s balanced them perfectly with the embossed sentiment in the opposite corner. The pop of red in that gorgeous bow just adds to the sophistication of the whole project. Congratulations Nat…you’re my Cut Above!


Is that the nicest thing you've ever heard or what???

ThankYouThankYouThankYou!!!
To Nance and the design team at The Paper Players. You've made my day!
(And probably my week too!)

Tuesday, September 6, 2011

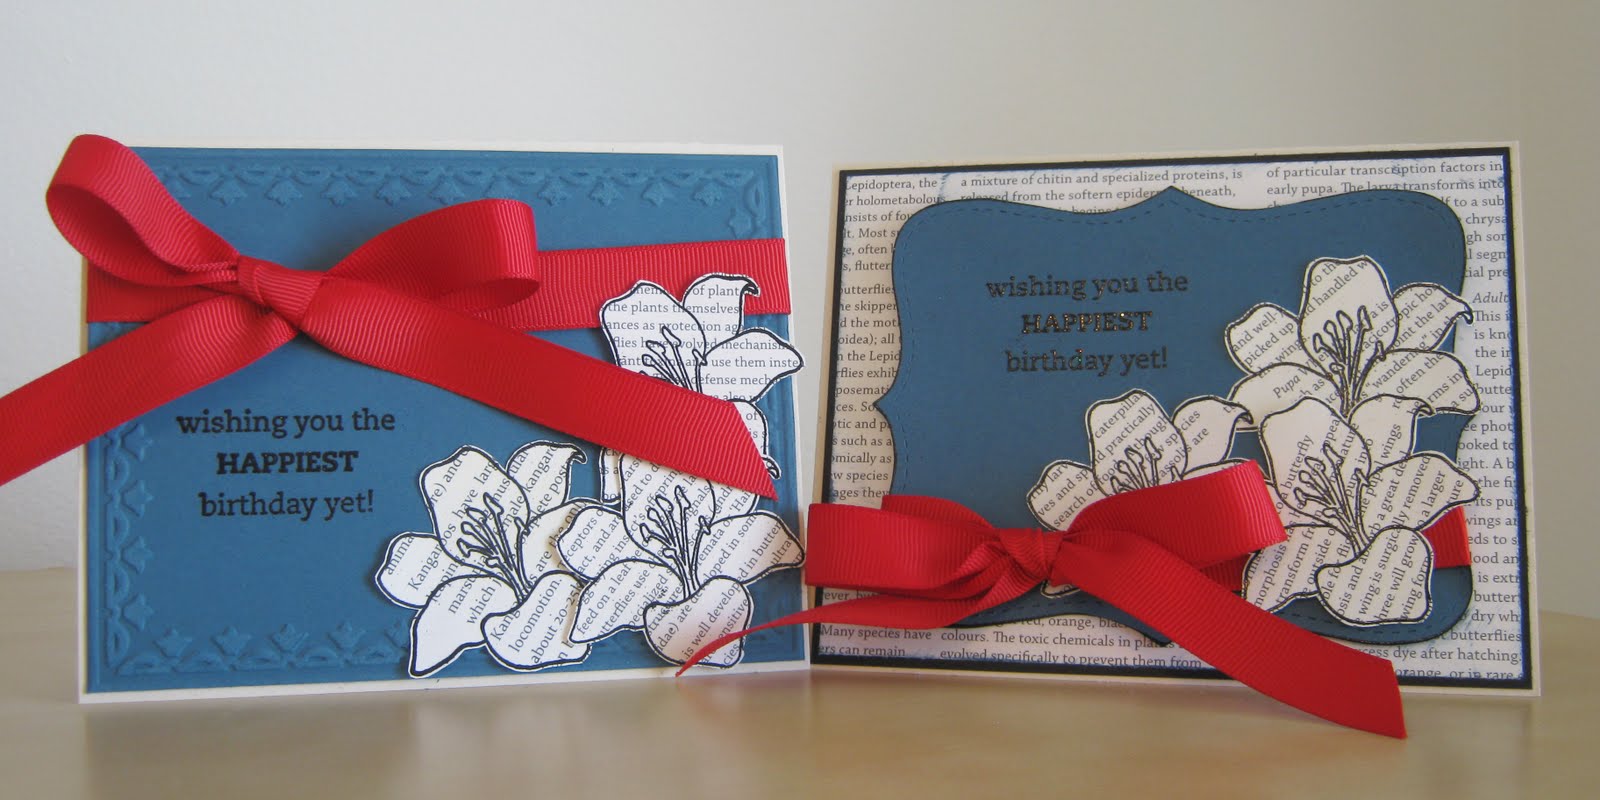
Fifth Avenue Bithday - Two Ways

Sometimes I get so excited to use all my new stuff that I forget about all the fantastic stuff I've had for a while, so today's card features some of my dustier items. I've loved my Fifth Avenue Floral set for a couple of years at least and there was a time when I didn't make anything without using my Top Note die and you know what? I still love them just as much after all this time!
The challenge for this week over at The Paper Players is all about birthdays, which is so nice because really, who doesn't need birthday cards? I know I always do!

All of the stamping was done using black embossing powder so while you can't see it in the picture, it has a cool glossy look to it which I love.

Here's another version of basically the same card. I like the first one better, but I wanted to show how one idea can really be made into a number of different cards.


And here they are together...

I used:
* Fifth Avenue Floral and On Your Birthday stamp sets
* Not Quite Navy and Natural Ivory card stocks
* First Edition designer paper
* Versamark ink and Black embossing Powder
* Not Quite Navy Ink (for distressing)
* Top Note Bigz Die
* Framed Tulips impressions folder
* Real Red 5/8" grosgrain ribbon (retired)

Cat Card from Space for Janet! (and what's up with Basic Gray?)

Seriously, what is up with Basic Gray?
Stampin' Up! has 50 exclusive colors and all of them (except Basic Gray) have an
Adorably Alliterative name.

Think about it: Pink Pirouette, Bravo Burgandy, Old Olive...etc. Alliteration!

Why not Basic Gray? I know the history of the basic colors getting moved into the color families and all of that, but come on! Crumb Cake rose from the ashes of Kraft so I know it can be done. Is Basic Gray just so boring a color that it doesn't deserve the same treatment?

Maybe.

But the Pals Paper Arts design team doesn't think so or they wouldn't have chosen it as one of the colors in this week's challenge.

Ppa color 

Here are some name ideas I thought might spice up poor Basic Gray just a little.
I'll start slow with some nice simple "G" words:
"Galvanized Gray"
"Gallant Gray"
"Gray Granite"
"Grandpa Gray"
"Grizzled Gray"

Or here are some more colorful (haha) idears:
"Barnacled Battleship"
"Cool Cumulonimbus"
"Chubby Cloud"
"Only Overcast"
"Grizzled Grandpa"
"Bottled Brains"

Better right?

Please leave me a comment to help me choose the new name for Basic Grey!  I promise to call it by whatever name gets the most votes forever and ever...or until it really does get a new name.
Feel free to suggest any names I may have over looked or, you know,  just weigh in on which one you like best!

As well as slaving over the fate of Basic Blah...I also made a card!
A Cat Card for Janet, who loves Cats! I love that!
I love people who love things. REALLY love things. It makes the world a special and interesting place to live in. And it also makes me love cats too. So thanks, Janet for making the world a better place.  And HAPPY BIRTHDAY!!!


When I showed this card to my husband (why do I still bother?) he said "It looks like The Cat From Outer Space."
The Cat From Outer Space - classic-disney
And perhaps he's not wrong, but who cares? I like the Cat From Outer Space AND he has an awesome collar. Whatever.

Here's the inside:
You may not be able to see it here but there is a very thin frame of Calypso Coral on the inside, similar to the frame on the front.
And one more picture of The Cat Card From Outer Space:
I'm loving the new Designer Frames impressions folders!

I used:
* C is for Cat and On Your Birthday stamp sets
* Cherry Cobbler, Calypso Coral, Whisper White and Basic Gray card stocks
* Basic Gray ink
* Polka Dots and Designer Frames impressions folders
* Whisper White 1/4" grosgrain ribbon
* Basic Rhinestones

Saturday, July 9, 2011

Happy Birthday Isaac!!!

My nephew Isaac turns 7 today!!! I had my son (who turns 7 this Thursday) design and color his card for me. Pretty good huh?
We used the new Need For Speed stamp set (which is great for any age of little boy) and a couple Stampin' Write markers to color it in.


After seeing how much fun Cannon had coloring this stamp I figured I'd give it a shot too and here is what I got:
(my plane sort of looks like its crashing. Oops. )


And I put a few of them in a pack for Mr. Isaac so he can use them for Thank You notes, which I know everyone (his mother) appreciates.
We got him a real present too in case you were wondering.

I used:
* Need for speed and On Your Birthday stamp sets ("thank you" is a non SU! sorry)
* Black Stayz On ink
* Basic Grey, Real Red and Whisper White card stock
* Stampin' Pastels and a blender pen
* Stripes embossing folder

Friday, March 18, 2011

COWBOYS!!! (Take time to savor them!)

You remember how a couple years ago everything was pirates? Well, that's how I'm feeling about cowboys lately. The last two movies I've seen are True Grit and Rango (loved both!), the last couple books I've been crazy about are set in Yellowstone (more to come on that!) and I've just moved into a neighborhood that is all western themed from street names and architecture to the elementary school my son goes to. I'm sort of obsessed and here are the products of my obsession:
I got the idea for this first card from a talented card maker named Michelle Pollard.

I am totally crushing on the little cowboy! He's so cute!!! OK OK I'm actually imagining him as Hugh Jackman in Australia. DROVER!!!!

 Need a closer look at that rope?
Who knew hemp twine could look so good? Not as good as THIS, but still, pretty good.  

Because I loved the rope idea so much, I thought I'd try it again but this time without any water coloring.  I'd like to dedicate this next card to Matt Damon. I know he isn't quite his typical self here, but COME ON!!!
Am I right?

And because I liked the boots so much, I had to make yet another card. And, if you hadn't caught on by now, this to is going to be dedicated to a special cowboy out there. This movie (Cowboys and Aliens!) hasn't actually come out yet, but let me just say that when it does, I'll be the first in line!!!
This one's for you Daniel Craig!!!
Is anyone even looking at the cards anymore?
I know I'm not.

So who wants to get your shiny cowgirl boots on and "Celebrate" Cowboys with me this summer at the movies???
Anyone? Anyone?
In case you were wondering, this card is a lot shinier in person. Darn Camera.

* I used (abbreviated list for first 3 cards)
* Out West and On Your Birthday stamp sets
* Cajun Craze, Early Espresso, Naturals Ivory, Crumb Cake
* Hemp Twine, Jumbo Eyelets
* Blender Pen and Stampin' Pastels
* Antique Wallpaper and Square Lattice embossing folders

I used (for the pink card)
* Rose Red, Basic Black (with Stayz On ink), and Whisper White
*Basic Rhinestones
* Silver Smooch Accent Ink

Tuesday, March 15, 2011

Button Birthday

I feel compelled again to show you the entire journey of making a card. Most of the time one good card takes at least 3 tries, sometimes more. My stamping room is normally filled with bits and pieces of cards I've made and torn apart and don't know what to do with.  This one only took 2 tries! Yay!!!
Here's Take One:

And Take Two:
Isn't it amazing what a layer can do? The whole card pops with color now and its just that much cuter. Also, adding this much card stock costs very little and doesn't harm the card's ability to fit in an envelope either. I say when in doubt, add a layer or two!

And how cute are those buttons?

I used:
* Button Button and On Your Birthday stamp sets
* Rose Red and Crumb Cake ink
* Rose Red, Crumb Cake, Old Olive, Daffodil Delight, Pumpkin Pie, Tempting Turquoise and Whisper White card stocks
* Old Olive 5/8" ribbon
* Sweet Buttons embosslit
* Two Tags Die

Monday, March 14, 2011

Build a Blossom!

I'm really trying to get back in the swing of stamping. I mean, holy cow, it's the middle of March and I haven't even used my spring mini goodies yet. I'm so ashamed.
So, the goal today was to thoroughly play with my Build a Blossom stamp set, Blossom Petals Punch and my Framed Tulips impressions folder. Here are the results!
This is the first card. The flower was super-fun to make but the card itself is super-boring!


So I used the same flower (basically) but spiced up the card a lot. Amazing what a difference a brad can make right? As well as a layer or two! But this flower was a problem now because while its fun and pretty, if I had to make a bunch of them I would hate my life and I have a rule that if I can't make 100 of them, I don't want to make any.


Which brought be to this little beauty. How happy is that yellow flower??? And how cute is the striped ribbon??? But for some reason I wasn't quite satisfied. I don't know why because I actually really love this particular card. Oh well.


But here is my last and final card. Not as flashy as the one with the brad or as cutesy as the one with the ribbon but for some reason, still my favorite. I guess I was in a plain and simple kind of mood. Who knows.

So which one is YOUR favorite???


I used:
* Build a Blossom, Teeny Tiny Wishes and On Your Birthday stamp sets
* Pink Pirouette, Naturals Ivory, Pear Pizazz, Early Espresso, Baja Breeze, Daffodil Delight, Old Olive and Very Vanilla (assorted card stocks and inks)
* Framed Tulips impressions folder
* Blossom Petals Punch, 1/2" circle punch, Word Window punch, Modern Label Punch, Crop-o-Dile
* Linen Thread
* Antique Brads, silver brads

Wednesday, September 29, 2010

Birthday Sunflowers

Happy Birthday!!!

I can't remember where I saw this idea to make sunflowers out of the scallop circle punches, but it was so great that I just couldn't wait to try it out!
To Make the sunflowers, just punch out your scallop circles and then trim the petals apart.  I also rounded them a little so they would fold forward to look more sunflowery. Add your textured middles and you're done! I'm thinking it would be pretty difficult to make a card with these flowers on it that wasn't adorable!

I used:
* On Your Birthday Stamp Set
* Early Espresso and Old Olive Markers
* Daffodil Delight, Early Espresso, Old Olive and Whisper White Card Stock
* 1 3/8" Circle punch, Scallop Circle and Extra Large Scallop Circle Punches
* Polka Dots Impressions Folder
* Hemp Twine

Monday, August 16, 2010

More Friends!

Here are a few miscellaneous cards I've made using the Friends Never Fade stamp set in the last couple of weeks.

 
This was for my best friend, Elizabeth. Happy Birthday!!!
I guess I should have used the stamp called Elizabeth for her. I'll work on that for next time.


This is a little 3x3 notecard that I made for Linda for winning the blog candy giveaway.
Congrats again Linda!
I'm not sure if you can see, but this card is covered with Vanilla Shimmer Smooch Spritz so it's really shiny and pretty. The colors I used for this are Blushing Bride and Pear Pizzazz. I'm loving those new in-colors!


This is a card I made for my Friends Never Fade class, but didn't make the cut because my hubby didn't like it. I still love the card so I'll probably be making one for each of the ladies coming to the class, as a thank you. I hope they like it as much as I do!
I better go get the final preparations done for my class on Wednesday. I'm so excited!

Thursday, July 29, 2010

PPA 53 - Purple!

Two posts from me today. Wow!

I made this card for today's Pals Paper Arts challenge. The challenge is to create a monochromatic card using purple. I haven't played along for a while (because most of the time I'm just a little on the lazy side) but today I realy wanted to play because I just purchased my Perfect Plum ink pad and hadn't come up with a reason to use it yet. Thanks PPA!!!


And the cute inside of the card.

I used:
* On Your Birthday and Friends Never Fade stamp sets
* Perfect Plum and Naturals Ivory
*Perfect Plum Designer Paper
* Basic Pearls (LOVE!)
* Two Tags die and Vintage Wallpaper Impressions Folder
*Corner Rounder and Ribbon Border Punches

Thursday, July 22, 2010

Open House Wrap up!

I know it's been a while and I'm totally slow to post this but here is the rest of the cards I made for my open house a couple weeks ago.
Here was the entry table. All full of Stampin' goodies and sign ups. I'm still working on getting the last of it put away actually. Too bad it's WAY more fun to stamp than it is to do housework!

This is the baking dish of tank you gifts for everyone who came and either signed up for something or placed an order. There were single stamps or packs of 3 cards. I made WAY to much stuff of course, but I suppose it's always better to be prepared.


This was the most popular card design, and also the most labor intensive of the three. I've been dying to use my Beautiful Wings die with a grass background stamp. Yay!
I used:
* Inspired by Nature stamp set
* Early Espresso, Daffodil Delight, Old Olive and Whisper White
* Extra Large Scallop Circle Punch, 1 3/4" circle punch, Beautiful Wings Embosslit Die
This was the least chosen card design of the bunch but it was my personal favorite. I was going for quick and cute and a little bit funky. Trust me, it looks even better in real life!
I used:
* On Your Birthday stamp set
* Concord Crush, Peach Parfait, Poppy Parade, Blushing Bride and Crumb Cake
* Wide Oval Punch, Small Heart Punch, Pear Pizazz Ribbon
Oh, and here's the cute inside.


And last but not least, this classy little number!
This card is great because it takes about 4 minutes to make, has no bumps for easy shipping and uses VERY little product and so is very inexpensive but I don't think it looks cheap. You know?

I used:
* Thank You Kindly and Ornate Blossom stamp set
* Very Vanilla and Soft Suede
* Baja Breeze designer paper
*Vintage Wallpaper Embossing Folder